quit lurking, I'm scared
Cory's No Name Build
Moderator: Ken

![]() by Vee Dub Nut » 02 Fri May, 2008 1:03 pm
by Vee Dub Nut » 02 Fri May, 2008 1:03 pm
I think its good that there is activity picking up on the board.. That always helps welcome in new people
(says the other newbie )
)
(says the other newbie
Fightin' Texas Aggie Class of 2006
1967 Beetle
19?? Buggy (Someday hopefully... unless I sell it too LOL)
2000 GTi
1967 Beetle
19?? Buggy (Someday hopefully... unless I sell it too LOL)
2000 GTi
- Vee Dub Nut
- Buggyholic
- Posts: 281
- Joined: 17 Mon Mar, 2008 6:21 pm
- Location: San Antonio, Tx
![]() by CoryN » 02 Fri May, 2008 1:11 pm
by CoryN » 02 Fri May, 2008 1:11 pm
Greaph wrote:a 2 minute response?!?!
quit lurking, I'm scared
Sorry - I have the luxury of working less than 2 miles from home, so I am at home eating lunch and surfing the web.
- CoryN
- Buggyholic
- Posts: 1108
- Joined: 30 Wed Jan, 2008 12:11 pm
- Location: McKinney, Texas

![]() by MURZ » 02 Fri May, 2008 11:44 pm
by MURZ » 02 Fri May, 2008 11:44 pm
I call it "action and drama"
stay tuned..Red Baron II
stay tuned..Red Baron II
Madisonville La
(Just north of where New Orleans used to be)
Dune buggies....Old men have to have something to excercise their minds and bodies
(Just north of where New Orleans used to be)
Dune buggies....Old men have to have something to excercise their minds and bodies
- MURZ
- Buggyholic
- Posts: 342
- Joined: 02 Sun Oct, 2005 10:06 pm
- Location: Madisonville La.
![]() by CoryN » 03 Sat May, 2008 7:20 am
by CoryN » 03 Sat May, 2008 7:20 am
MURZ wrote:I call it "action and drama"
stay tuned..Red Baron II
I'm looking forward to watching a veteran build. You guys are on a whole different level than this noob. I'm hoping after a couple of these I can put together something to be proud of.
- CoryN
- Buggyholic
- Posts: 1108
- Joined: 30 Wed Jan, 2008 12:11 pm
- Location: McKinney, Texas
![]() by MURZ » 03 Sat May, 2008 6:06 pm
by MURZ » 03 Sat May, 2008 6:06 pm
Not a veteran, just a big dreamer..
Troll the internet and you will get ton's of idea's
Troll the internet and you will get ton's of idea's
Madisonville La
(Just north of where New Orleans used to be)
Dune buggies....Old men have to have something to excercise their minds and bodies
(Just north of where New Orleans used to be)
Dune buggies....Old men have to have something to excercise their minds and bodies
- MURZ
- Buggyholic
- Posts: 342
- Joined: 02 Sun Oct, 2005 10:06 pm
- Location: Madisonville La.
![]() by CoryN » 05 Mon May, 2008 6:15 pm
by CoryN » 05 Mon May, 2008 6:15 pm
Well I took the buggy to the proctologist for its first visit
Before

After

Not finished by any means, but all the rough work is taken care of. I shot a little rattlecan primer on just to see how it was coming, I'll sand that off and do one more coat of mat/resin and then sand that down and break out the filler. Shouldn't take much, I was able to get pretty close with just the fiberglass/resin. I'll try to keep the filler to a minimum. I've got a number of stress fractures due to it being so weak from being all hacked up, thats why I want to coat the entire rear with a new layer of glass.
Thanks for looking
Before
After
Not finished by any means, but all the rough work is taken care of. I shot a little rattlecan primer on just to see how it was coming, I'll sand that off and do one more coat of mat/resin and then sand that down and break out the filler. Shouldn't take much, I was able to get pretty close with just the fiberglass/resin. I'll try to keep the filler to a minimum. I've got a number of stress fractures due to it being so weak from being all hacked up, thats why I want to coat the entire rear with a new layer of glass.
Thanks for looking
- CoryN
- Buggyholic
- Posts: 1108
- Joined: 30 Wed Jan, 2008 12:11 pm
- Location: McKinney, Texas
![]() by Vee Dub Nut » 05 Mon May, 2008 8:40 pm
by Vee Dub Nut » 05 Mon May, 2008 8:40 pm
Wow thats good glasswork!
Fightin' Texas Aggie Class of 2006
1967 Beetle
19?? Buggy (Someday hopefully... unless I sell it too LOL)
2000 GTi
1967 Beetle
19?? Buggy (Someday hopefully... unless I sell it too LOL)
2000 GTi
- Vee Dub Nut
- Buggyholic
- Posts: 281
- Joined: 17 Mon Mar, 2008 6:21 pm
- Location: San Antonio, Tx
![]() by Vee Dub Nut » 15 Thu May, 2008 7:57 pm
by Vee Dub Nut » 15 Thu May, 2008 7:57 pm
Any progress? I need some motivation
Mine's still sitting and probably will be until after the blast unfortunately.. need to get on those floors
Mine's still sitting and probably will be until after the blast unfortunately.. need to get on those floors
Fightin' Texas Aggie Class of 2006
1967 Beetle
19?? Buggy (Someday hopefully... unless I sell it too LOL)
2000 GTi
1967 Beetle
19?? Buggy (Someday hopefully... unless I sell it too LOL)
2000 GTi
- Vee Dub Nut
- Buggyholic
- Posts: 281
- Joined: 17 Mon Mar, 2008 6:21 pm
- Location: San Antonio, Tx
![]() by Aquabuggy » 15 Thu May, 2008 8:16 pm
by Aquabuggy » 15 Thu May, 2008 8:16 pm
OH, you'll get plenty of motivation at the blast.
My name is Chris and well I'm a buggy-aholic
04 Aqua buggy - sold
72 Orange buggy - sold
72 Green longbody - aka Shrek http://texasmanxclub.com/bboard/viewtopic.php?t=1082
68 Manx - viewtopic.php?f=11&t=2509
04 Aqua buggy - sold
72 Orange buggy - sold
72 Green longbody - aka Shrek http://texasmanxclub.com/bboard/viewtopic.php?t=1082
68 Manx - viewtopic.php?f=11&t=2509
-

Aquabuggy - Buggyholic
- Posts: 942
- Joined: 02 Sun Oct, 2005 10:18 am
- Location: Victoria Tx
![]() by CoryN » 15 Thu May, 2008 9:08 pm
by CoryN » 15 Thu May, 2008 9:08 pm
Yes I've been hard at it. Just came in from the shop in fact. There were a number of stress fractures across the rear and the rear fenders as a result of the weakening of the rear from the big cut-outs the PO did. So I covered the entire rear of the buggy with a layer of glass and resin. I don't want to use any filler, and I was afraid the stress fractures would reappear through the paint. A whole lot of extra work, but its turning out well.
The engine is almost running again, and just need to reassemble the hubs and brakes. Time to order some new Cragar SS rims and BFG's and it will be back to roller status.
Then I'm going to make some side pods from scratch. I found a really good fiberglass forum and really got inspired.
The engine is almost running again, and just need to reassemble the hubs and brakes. Time to order some new Cragar SS rims and BFG's and it will be back to roller status.
Then I'm going to make some side pods from scratch. I found a really good fiberglass forum and really got inspired.
- CoryN
- Buggyholic
- Posts: 1108
- Joined: 30 Wed Jan, 2008 12:11 pm
- Location: McKinney, Texas
![]() by Faron » 17 Sat May, 2008 12:07 am
by Faron » 17 Sat May, 2008 12:07 am
OK I looked at the date you started this thread.  It was March 20Th, of this year. If I have this correct...you have only been working on this Buggy for just over 2 months. You have got this far... AND you are married. It took me almost a year to get to the same point.
  Arrrgggggggg HaHaHa
Just kidding, I am happy for you!
Just kidding, I am happy for you!
Get out there and enjoy your Dune Buggy! www.savethetexasdunebuggy.com faron@savethetexasdunebuggy.com
- Faron
- Buggyholic
- Posts: 869
- Joined: 04 Tue Oct, 2005 10:20 pm
- Location: Canyon Lake, Texas
hey
![]() by Texasbuggys » 17 Sat May, 2008 9:05 pm
by Texasbuggys » 17 Sat May, 2008 9:05 pm
Hey Faron, you still working the mini dealerships? Any chance at this one you can get some old crashed front parts? I need the sections where the headlights mount on both sides.
Get your new short or long body, custom chassis, show cages, bumpers and accessories at http://www.texasbuggys.com
E-Mail Texasbuggys@suddenlink.net or call 361-218-6272
E-Mail Texasbuggys@suddenlink.net or call 361-218-6272
-

Texasbuggys - Buggyholic
- Posts: 1039
- Joined: 01 Sat Oct, 2005 9:30 pm
- Location: Victoria Texas
![]() by Faron » 17 Sat May, 2008 10:50 pm
by Faron » 17 Sat May, 2008 10:50 pm
You are very lucky to have a wife that will let you build that thing so quick.
Yes I am still with MINI. Only now I am with Sandia MINI in Albuquerque. Our dealership is one of the coolest in the nation. Check out our website, the owner has won all sorts of awards for the building! www.sandiamini.com
We dont have a Body Shop, so we do not have any beat up old MINIs around. Let me know what you need, I get employee pricing on parts. Perhaps I can get what you need for cheap! Probally best if you take a photo of what you need in order for me to go look. Just let me know!
Get out there and enjoy your Dune Buggy! www.savethetexasdunebuggy.com faron@savethetexasdunebuggy.com
- Faron
- Buggyholic
- Posts: 869
- Joined: 04 Tue Oct, 2005 10:20 pm
- Location: Canyon Lake, Texas
OK I'm a Retard
![]() by CoryN » 18 Sun May, 2008 7:47 pm
by CoryN » 18 Sun May, 2008 7:47 pm
Started to work on putting brakes back in.


But I didn't take good notes before I tore it all apart. Which of these springs is for where?

But I didn't take good notes before I tore it all apart. Which of these springs is for where?
- CoryN
- Buggyholic
- Posts: 1108
- Joined: 30 Wed Jan, 2008 12:11 pm
- Location: McKinney, Texas
![]() by Vee Dub Nut » 18 Sun May, 2008 9:24 pm
by Vee Dub Nut » 18 Sun May, 2008 9:24 pm
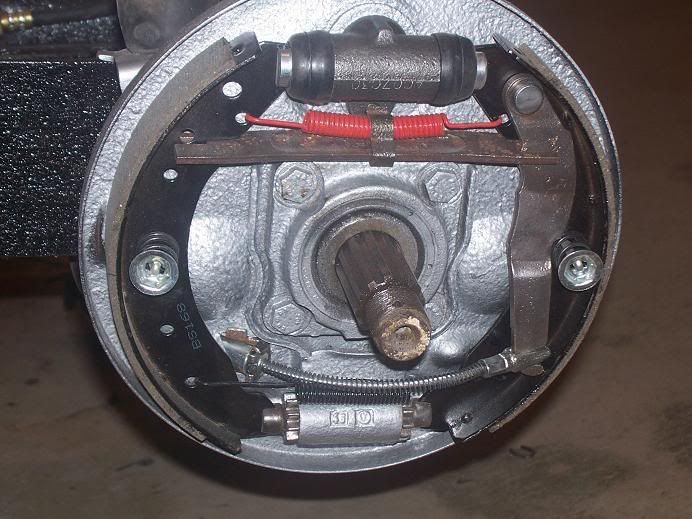
Ok.. so its been a while since I've been into my brakes this far.. but
the large spring goes between the shoes closest to the wheel cylinder I know..
I'm not sure on the smaller springs.. since the length is different they should be easy to figure out. I assume these are springs from both front and back brakes? How many of each do you have?
Here are a few reference pics...
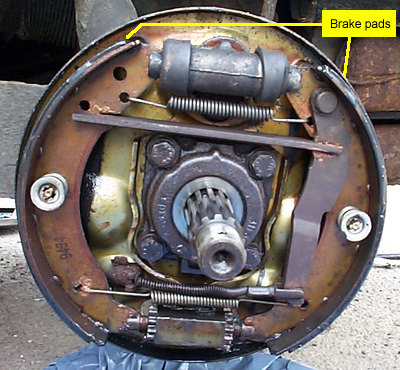

reference article
http://www.vwtrendsweb.com/tech/0311vwt ... to_01.html
the large spring goes between the shoes closest to the wheel cylinder I know..
I'm not sure on the smaller springs.. since the length is different they should be easy to figure out. I assume these are springs from both front and back brakes? How many of each do you have?
Here are a few reference pics...
reference article
http://www.vwtrendsweb.com/tech/0311vwt ... to_01.html
Fightin' Texas Aggie Class of 2006
1967 Beetle
19?? Buggy (Someday hopefully... unless I sell it too LOL)
2000 GTi
1967 Beetle
19?? Buggy (Someday hopefully... unless I sell it too LOL)
2000 GTi
- Vee Dub Nut
- Buggyholic
- Posts: 281
- Joined: 17 Mon Mar, 2008 6:21 pm
- Location: San Antonio, Tx
![]() by CoryN » 18 Sun May, 2008 10:06 pm
by CoryN » 18 Sun May, 2008 10:06 pm
Well to complicate matters further - its two rears and one front. The transaxle I'm using didn't have the emergency brakes on it, so I had to pull apart the other rear end I have and scavenge the e-brake parts. I threw all the parts in the same bucket.
I'm pretty sure that the heavy springs (A) are to the front as I only have two of them. I have 4 B's and 4 C's.
I'm pretty sure that the heavy springs (A) are to the front as I only have two of them. I have 4 B's and 4 C's.
- CoryN
- Buggyholic
- Posts: 1108
- Joined: 30 Wed Jan, 2008 12:11 pm
- Location: McKinney, Texas
![]() by Vee Dub Nut » 18 Sun May, 2008 10:38 pm
by Vee Dub Nut » 18 Sun May, 2008 10:38 pm
CoryN wrote:So I guess doing the math,
A's go on front.
B's go on rear
C's go on both.
Now its just a matter of which are on top and which are on bottom.
Ok I looked through some of my old '67 sedan pics and I think your right... except it still doesnt make sense that you only had one front set
The longer of the skinny ones should go on the bottom of the rear.. the shorter skinny ones on the top.
The front has one big fat one next to the wheel cylinder, and one skinny one on the opposite side.
Fightin' Texas Aggie Class of 2006
1967 Beetle
19?? Buggy (Someday hopefully... unless I sell it too LOL)
2000 GTi
1967 Beetle
19?? Buggy (Someday hopefully... unless I sell it too LOL)
2000 GTi
- Vee Dub Nut
- Buggyholic
- Posts: 281
- Joined: 17 Mon Mar, 2008 6:21 pm
- Location: San Antonio, Tx
![]() by Vee Dub Nut » 19 Mon May, 2008 7:50 am
by Vee Dub Nut » 19 Mon May, 2008 7:50 am
Oh ok.. that makes more sense
That should be right then
That should be right then
Fightin' Texas Aggie Class of 2006
1967 Beetle
19?? Buggy (Someday hopefully... unless I sell it too LOL)
2000 GTi
1967 Beetle
19?? Buggy (Someday hopefully... unless I sell it too LOL)
2000 GTi
- Vee Dub Nut
- Buggyholic
- Posts: 281
- Joined: 17 Mon Mar, 2008 6:21 pm
- Location: San Antonio, Tx
![]() by CoryN » 19 Mon May, 2008 9:56 am
by CoryN » 19 Mon May, 2008 9:56 am
That confirms what I was going to do. The e-brake bar is the same for both sides correct, it has hump up on one side and hump down on the other? I was thinking the spring should clip in the recess on both sides, but your picture confirms that one side is hump up.
Thanks.
I painted all my springs - yours come those colors?
Thanks.
I painted all my springs - yours come those colors?
- CoryN
- Buggyholic
- Posts: 1108
- Joined: 30 Wed Jan, 2008 12:11 pm
- Location: McKinney, Texas
![]() by blackthree4me » 20 Tue May, 2008 9:28 pm
by blackthree4me » 20 Tue May, 2008 9:28 pm
nice job keep it up
it seems to sit on a finished pan for a long time
you are doing a great job
get a manual it will save you time
blackthree4me
it seems to sit on a finished pan for a long time
you are doing a great job
get a manual it will save you time
blackthree4me
if it aint broke, break it then fix it
-

blackthree4me - Buggyholic
- Posts: 631
- Joined: 12 Wed Oct, 2005 1:13 pm
- Location: Spring TX
![]() by CoryN » 20 Tue May, 2008 10:08 pm
by CoryN » 20 Tue May, 2008 10:08 pm
Thanks - the brakes seem to be giving me fits. I just had to leave it tonight and walk away. It should be just simple assembly, but for some reason...the front shoes don't seem to be fitting correctly and the stupid little clips that hold the e-brake cables. Ugh...
- CoryN
- Buggyholic
- Posts: 1108
- Joined: 30 Wed Jan, 2008 12:11 pm
- Location: McKinney, Texas
![]() by GregR » 21 Wed May, 2008 8:14 am
by GregR » 21 Wed May, 2008 8:14 am
don't know if this is your issue, but something I found out the hard way about getting the drums on. The slotted pieces the shoes fit into aren't symmetrical. That is, one end of the slot is shallower than the other. If you try to install things upside down, the drums won't fit over the shoes. Just another little gotcha.....
GregR
-

GregR - Site Admin
- Posts: 1337
- Joined: 20 Tue Sep, 2005 9:47 am
- Location: North Texas

![]() by CoryN » 21 Wed May, 2008 8:45 am
by CoryN » 21 Wed May, 2008 8:45 am
These were the original clips, so they should be fine, but I think they got a little bent in the removal process  I seem to remember finally grabbing on to them with a visegrip and pulling them off.
I need to re-examine the fronts and make sure I got the correct shoes, maybe that is the problem. I'm so close to getting it back on wheels, but yet so far...
I need to re-examine the fronts and make sure I got the correct shoes, maybe that is the problem. I'm so close to getting it back on wheels, but yet so far...
- CoryN
- Buggyholic
- Posts: 1108
- Joined: 30 Wed Jan, 2008 12:11 pm
- Location: McKinney, Texas
![]() by CoryN » 21 Wed May, 2008 8:46 am
by CoryN » 21 Wed May, 2008 8:46 am
GregR wrote:don't know if this is your issue, but something I found out the hard way about getting the drums on. The slotted pieces the shoes fit into aren't symmetrical. That is, one end of the slot is shallower than the other. If you try to install things upside down, the drums won't fit over the shoes. Just another little gotcha.....
Are you meaning the screws that go into the adjusting stars? I did notice they were angled, maybe I put them in backwards, I'll double check that too.
- CoryN
- Buggyholic
- Posts: 1108
- Joined: 30 Wed Jan, 2008 12:11 pm
- Location: McKinney, Texas
![]() by CoryN » 21 Wed May, 2008 9:15 pm
by CoryN » 21 Wed May, 2008 9:15 pm
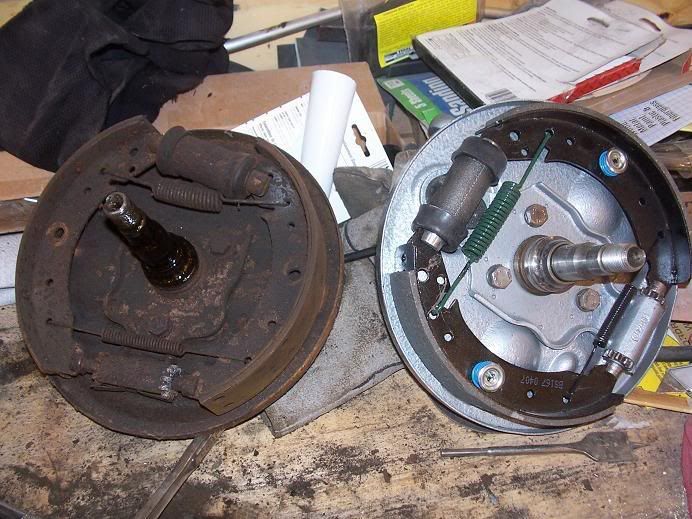
Didn't get a chance to mess with it at all tonight, but wanted to get an idea what baby's new shoes might look like. So I just posed them.


Cragar S/S 15"x10.5" with N50's rear and 14"x7" with F60's front. Old Skool Kelly Springfields with less than 200 miles on them, still have the production nubbies on them. Need some cleaning up, but period correct.
Cragar S/S 15"x10.5" with N50's rear and 14"x7" with F60's front. Old Skool Kelly Springfields with less than 200 miles on them, still have the production nubbies on them. Need some cleaning up, but period correct.
- CoryN
- Buggyholic
- Posts: 1108
- Joined: 30 Wed Jan, 2008 12:11 pm
- Location: McKinney, Texas
![]() by blackthree4me » 21 Wed May, 2008 10:30 pm
by blackthree4me » 21 Wed May, 2008 10:30 pm
on those clips
get new ones
I installed some old ones one time and it broke
slid around on the inside if the drum untill it lodged under the shoe and ground in to the drum.
beware
blackthree4me
get new ones
I installed some old ones one time and it broke
slid around on the inside if the drum untill it lodged under the shoe and ground in to the drum.
beware
blackthree4me
if it aint broke, break it then fix it
-
blackthree4me - Buggyholic
- Posts: 631
- Joined: 12 Wed Oct, 2005 1:13 pm
- Location: Spring TX
![]() by Vee Dub Nut » 22 Thu May, 2008 6:56 am
by Vee Dub Nut » 22 Thu May, 2008 6:56 am
Looking good!
Fightin' Texas Aggie Class of 2006
1967 Beetle
19?? Buggy (Someday hopefully... unless I sell it too LOL)
2000 GTi
1967 Beetle
19?? Buggy (Someday hopefully... unless I sell it too LOL)
2000 GTi
- Vee Dub Nut
- Buggyholic
- Posts: 281
- Joined: 17 Mon Mar, 2008 6:21 pm
- Location: San Antonio, Tx
![]() by CoryN » 26 Mon May, 2008 6:21 pm
by CoryN » 26 Mon May, 2008 6:21 pm
Ok - so I got inspired at the buggy blast. Sorry no detailed pics of the process. I was told to knock off the pics and just get it built

Got the brakes back together and the wheels on.


Looks like I probably need to put in adjusters and lower the front.

Got the brakes back together and the wheels on.
Looks like I probably need to put in adjusters and lower the front.
- CoryN
- Buggyholic
- Posts: 1108
- Joined: 30 Wed Jan, 2008 12:11 pm
- Location: McKinney, Texas
![]() by Vee Dub Nut » 26 Mon May, 2008 7:21 pm
by Vee Dub Nut » 26 Mon May, 2008 7:21 pm
Those are some beefy tires
Fightin' Texas Aggie Class of 2006
1967 Beetle
19?? Buggy (Someday hopefully... unless I sell it too LOL)
2000 GTi
1967 Beetle
19?? Buggy (Someday hopefully... unless I sell it too LOL)
2000 GTi
- Vee Dub Nut
- Buggyholic
- Posts: 281
- Joined: 17 Mon Mar, 2008 6:21 pm
- Location: San Antonio, Tx
![]() by CoryN » 30 Fri May, 2008 3:33 pm
by CoryN » 30 Fri May, 2008 3:33 pm
A bit of good news today. I had someone look at my engine for me, to evaluate what I had and where I stood before I took a crack at it.
As luck would have it, it appears to be a fresh rebuild. Beneath the rusty fan shroud, everything appears to be in good shape. I got to hear it run before I took it home.
As luck would have it, it appears to be a fresh rebuild. Beneath the rusty fan shroud, everything appears to be in good shape. I got to hear it run before I took it home.
- CoryN
- Buggyholic
- Posts: 1108
- Joined: 30 Wed Jan, 2008 12:11 pm
- Location: McKinney, Texas
![]() by Vee Dub Nut » 30 Fri May, 2008 5:23 pm
by Vee Dub Nut » 30 Fri May, 2008 5:23 pm
Good deal.. .you should be up and running in no time!
Fightin' Texas Aggie Class of 2006
1967 Beetle
19?? Buggy (Someday hopefully... unless I sell it too LOL)
2000 GTi
1967 Beetle
19?? Buggy (Someday hopefully... unless I sell it too LOL)
2000 GTi
- Vee Dub Nut
- Buggyholic
- Posts: 281
- Joined: 17 Mon Mar, 2008 6:21 pm
- Location: San Antonio, Tx
![]() by Aquabuggy » 31 Sat May, 2008 11:50 am
by Aquabuggy » 31 Sat May, 2008 11:50 am
Hey Cory your buggy's looking real good!
If you don't mind Id like to make a suggestion, Before you get to much farther along you might want to consider adding adjusters in your front beam.
The fiberglass body is much lighter then a bug body so your front end will be up in the air.
I had to learn this the hard way and ended up tearing my first buggy back down to install an adjustable beam
My name is Chris and well I'm a buggy-aholic
04 Aqua buggy - sold
72 Orange buggy - sold
72 Green longbody - aka Shrek http://texasmanxclub.com/bboard/viewtopic.php?t=1082
68 Manx - viewtopic.php?f=11&t=2509
04 Aqua buggy - sold
72 Orange buggy - sold
72 Green longbody - aka Shrek http://texasmanxclub.com/bboard/viewtopic.php?t=1082
68 Manx - viewtopic.php?f=11&t=2509
-
Aquabuggy - Buggyholic
- Posts: 942
- Joined: 02 Sun Oct, 2005 10:18 am
- Location: Victoria Tx
![]() by CoryN » 31 Sat May, 2008 1:37 pm
by CoryN » 31 Sat May, 2008 1:37 pm
Yes - I'm already thinking along those lines. Has anyone taken a couple of leaves out of the front beam to give it more suspension and as a result lower it some? Obviously I won't have as much weight up front as a beetle, so won't have the benefit of the springiness with it set up stock.
- CoryN
- Buggyholic
- Posts: 1108
- Joined: 30 Wed Jan, 2008 12:11 pm
- Location: McKinney, Texas
Who is online
Users browsing this forum: No registered users and 57 guests