Cory's No Name Build

Show us your project. In progress or finished!

Moderator: Ken

Cory's No Name Build

Postby CoryN » 20 Thu Mar, 2008 10:19 am

Gossamer was the name of my first hot rod back in school, a 1969 Pontiac Bonneville 4 door convertible, a rat rod if you will. It was black with green flames and green fake fur interior.

In homage to those good old days, I'm calling my buggy Gossamer - which means a film of cobwebs floating in air in calm clear weather or something light, delicate, insubstantial and tenuous. Probably get my man card revoked for that.

I've wanted a buggy for years, and finally decided to just jump in with both feet. I wanted a basket case as I love to have a project to work on, and Gossamer certainly fits that bill. Nothing mechanical is in working order and there is a vast amount of fiberglass repair to keep me busy for a good long time. I have absolutely no mechanical skills of any kind, I've been an avid woodworker all my life, and this is my first foray into something else. So I am certain many a mistake will be made as I make my way through this.

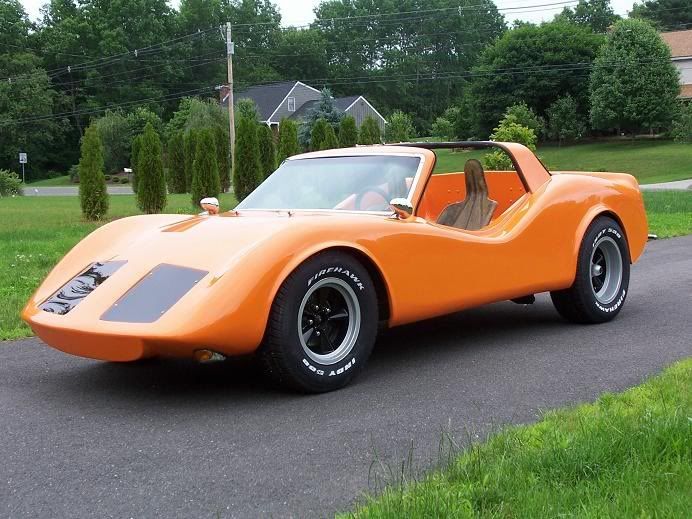
So - here is Gossamer in the wild

Image

Image

Upon closer inspection, the pan is toast
:shock:

Image

So enter buggy #2

Image

In addition to the fine dog bowl and stainless salad bowl, buggy #2 has an alledgedly running engine.

But once again, the pan is toast. The floorboards, or absence there of could be dealt with, but there was significant rust under the frame horns and the frame head was bent from some collision of long ago.

Image

Jury is still out on the engine, but it isn't frozen and has good compression, so I think it will be ok.

Image

So - enter pan #3

This one is a winner, aside from some rust in the back floorboard wells, everything else is in good shape

Image

-to be continued-
Last edited by CoryN on 25 Tue Nov, 2008 7:33 pm, edited 1 time in total.
CoryN
Buggyholic
 
Posts: 1108
Joined: 30 Wed Jan, 2008 12:11 pm
Location: McKinney, Texas

Postby CoryN » 20 Thu Mar, 2008 10:34 am

Here is the body, cleaned, sterilized and disinfected. (the neighbors love me now :roll: )

Image

And the obligatory test fit on the new pan

Image

Image

-to be continued-
CoryN
Buggyholic
 
Posts: 1108
Joined: 30 Wed Jan, 2008 12:11 pm
Location: McKinney, Texas

Postby CoryN » 20 Thu Mar, 2008 10:41 am

Now for a little work on that front fender

Image

I mistakenly determined that it was just the lip that was broken off. So I fashioned a form from foam (say that fast 3 times) and glassed it in.

Image

But I discovered the error of my ways, so I fashioned a cardboard template from the other fender and attached one to the top and one to the bottom of the broken fender

Image

The stick was used for alignment purposes, to keep it in plane with the other fender. Then I filled in the void with Great Stuff spray insulation

Image

Then after it dried, I shaped it to match the other fender.

Image

I've since glassed over the form, but I just discovered I don't have any pictures of it.

-to be continued-
CoryN
Buggyholic
 
Posts: 1108
Joined: 30 Wed Jan, 2008 12:11 pm
Location: McKinney, Texas

Postby GregR » 20 Thu Mar, 2008 2:41 pm

Looks like you're on a great track with it. Nice work reshaping the fender too. Keep us posted. I think we all want to see how this one turns out.
Last edited by GregR on 21 Fri Mar, 2008 11:20 am, edited 1 time in total.
GregR
User avatar
GregR
Site Admin
 
Posts: 1335
Joined: 20 Tue Sep, 2005 9:47 am
Location: North Texas

Postby Bill K » 20 Thu Mar, 2008 10:19 pm

Judging by what you have already accomplished, it looks like another great buggy may be in the making.
Don't forget, when you need help, let us know, and how about coming to the Buggy Blast to meet us all?
Dream It - Plan It - Build It
User avatar
Bill K
Buggyholic
 
Posts: 2168
Joined: 06 Thu Oct, 2005 8:08 am

Postby CoryN » 21 Fri Mar, 2008 8:24 am

Thanks Bill and Greg,

Yes I will be coming to the Buggy Blast, and if I can at least get this back to the stage where its a roller, I'll put it on a trailer and bring it along.

I look forward to meeting y'all, I've read all your posts, every post on this forum in fact, it was a great resource before getting started.

Might even see a few of you at the Classic, I'm going to try and hit that as well.

Cory
CoryN
Buggyholic
 
Posts: 1108
Joined: 30 Wed Jan, 2008 12:11 pm
Location: McKinney, Texas

Postby Bill K » 21 Fri Mar, 2008 9:32 am

There are several of us planning on the Classic. So, you bet, look us up.
Dream It - Plan It - Build It
User avatar
Bill K
Buggyholic
 
Posts: 2168
Joined: 06 Thu Oct, 2005 8:08 am

Project

Postby Texasbuggys » 21 Fri Mar, 2008 12:41 pm

Looks great, those wheels will clean up really nice and add to the overall look of the buggy once completed! Great start!
Get your new short or long body, custom chassis, show cages, bumpers and accessories at http://www.texasbuggys.com

E-Mail Texasbuggys@suddenlink.net or call 361-218-6272
User avatar
Texasbuggys
Buggyholic
 
Posts: 1039
Joined: 01 Sat Oct, 2005 9:30 pm
Location: Victoria Texas

Postby CoryN » 21 Fri Mar, 2008 1:20 pm

Unfortunately the wheels are just a little bit too far gone to clean up, there is quite a bit of pitting in the chrome, especially on the rears. As they were the Cragar G/T's which were painted in the first place, I am leaning towards having them powdercoated.

I'm planning on doing the buggy in a lime green with a white interior, so I am on the fence regarding the wheels. Part of me is thinking a gun metal gray/aluminum look, part of me is thinking gray with white spokes and part of me is thinking all white.

And part of me is thinking new chrome Cragar SS's.
CoryN
Buggyholic
 
Posts: 1108
Joined: 30 Wed Jan, 2008 12:11 pm
Location: McKinney, Texas

Wheels

Postby Texasbuggys » 21 Fri Mar, 2008 2:33 pm

Take them to a pro powder coater and they can fix them up like new, just make sure the shop has done repairs before. I ahve seen some work on stuff that looked way beyond savig that once done were a piece of art. Those wheels are worth $$$ and surely will finish off the car.
Get your new short or long body, custom chassis, show cages, bumpers and accessories at http://www.texasbuggys.com

E-Mail Texasbuggys@suddenlink.net or call 361-218-6272
User avatar
Texasbuggys
Buggyholic
 
Posts: 1039
Joined: 01 Sat Oct, 2005 9:30 pm
Location: Victoria Texas

Postby blackthree4me » 26 Wed Mar, 2008 12:23 pm

Jeez your a glutin for punishment
that thing was a POS I thought mine was bad LOL
I got a good Laugh at that first chassie WTF were they thinking?
so far you have done a great job! Keep it up!

I agree with sparky on the wheels keep them and get them cleaned and done wright even if you dont use them someone else will
blackthree4me
if it aint broke, break it then fix it
User avatar
blackthree4me
Buggyholic
 
Posts: 631
Joined: 12 Wed Oct, 2005 1:13 pm
Location: Spring TX

Postby CoryN » 26 Wed Mar, 2008 1:41 pm

Well I did say I was looking for a project. I'll just appreciate it that much more when I get it fixed up. ;-)
CoryN
Buggyholic
 
Posts: 1108
Joined: 30 Wed Jan, 2008 12:11 pm
Location: McKinney, Texas

Postby jspbtown » 26 Wed Mar, 2008 2:45 pm

Your doing a great job! Bringing these old buggies back to life is a real joy for me. And the best part about glass work is exactly what you discovered....if it isn't right...start again!

A client's car had those same wheels. He didn't want to spend alot on them and they looked just as bad as yours. Some sanding, some high build rattle can primer, more sanding, and rattle can paint made them look like this for about $40. Just an option....

Image
jspbtown
Buggyholic
 
Posts: 250
Joined: 26 Wed Dec, 2007 9:57 am

WHEELS

Postby Texasbuggys » 26 Wed Mar, 2008 4:39 pm

Or better yet, give them to me! I will takem :)
Get your new short or long body, custom chassis, show cages, bumpers and accessories at http://www.texasbuggys.com

E-Mail Texasbuggys@suddenlink.net or call 361-218-6272
User avatar
Texasbuggys
Buggyholic
 
Posts: 1039
Joined: 01 Sat Oct, 2005 9:30 pm
Location: Victoria Texas

Postby CoryN » 26 Wed Mar, 2008 6:30 pm

If I don't use them on the buggy - I'm going to put em on a volksrod/ratrod - I'm thinking I'm going to get bitten by that bug next
CoryN
Buggyholic
 
Posts: 1108
Joined: 30 Wed Jan, 2008 12:11 pm
Location: McKinney, Texas

Some Progress on the Pan

Postby CoryN » 21 Mon Apr, 2008 5:51 pm

Slowly making some progress, went from this

Image

to this

Image

Learned how to weld on this little part of the build. Not the prettiest welds, but I got enough stacks of dimes in there to hold it all together.
;-)
CoryN
Buggyholic
 
Posts: 1108
Joined: 30 Wed Jan, 2008 12:11 pm
Location: McKinney, Texas

Postby Bryan Porter » 21 Mon Apr, 2008 6:00 pm

Is that a bud in the fore ground
a few cold ones make the welds
look a lot better.
Bryan Porter
Buggyholic
 
Posts: 946
Joined: 03 Fri Nov, 2006 10:14 am
Location: Pinehurst.Tx

Postby CoryN » 21 Mon Apr, 2008 6:03 pm

That is a Bud :roll:

Actually after a few, the welds seemed to turn out a little better, or maybe I just got better as I went along ;-)
CoryN
Buggyholic
 
Posts: 1108
Joined: 30 Wed Jan, 2008 12:11 pm
Location: McKinney, Texas

Postby jspbtown » 22 Tue Apr, 2008 8:56 am

I don't know about nyone else but I think we are having the wool pulled over our eyes by Cory. In his first post he said he "had no mechanical skills".

I am finding that hard to believe between his body work and his chassis repairs.

great work!
jspbtown
Buggyholic
 
Posts: 250
Joined: 26 Wed Dec, 2007 9:57 am

Postby CoryN » 22 Tue Apr, 2008 9:01 am

Thanks for your kind words.

Truly I have no automotive experience whatsoever. I've built houses from the ground up, I've built all kinds of furniture, but never dealt in automotives or metalwork.

Surprisingly, it hasn't been as difficult a learning curve as I thought, thanks to sites like this where I can gather all the information I need.
CoryN
Buggyholic
 
Posts: 1108
Joined: 30 Wed Jan, 2008 12:11 pm
Location: McKinney, Texas

Postby Aquabuggy » 22 Tue Apr, 2008 11:34 am

Yea and whats with the "Slowly making some progress"? Looks to me like your making really good progress!

All BS aside Its looking real good, keep it up and keep the updates on your build coming.
My name is Chris and well I'm a buggy-aholic

04 Aqua buggy - sold
72 Orange buggy - sold
72 Green longbody - aka Shrek http://texasmanxclub.com/bboard/viewtopic.php?t=1082
68 Manx - viewtopic.php?f=11&t=2509
User avatar
Aquabuggy
Buggyholic
 
Posts: 942
Joined: 02 Sun Oct, 2005 10:18 am
Location: Victoria Tx

Postby Bill K » 22 Tue Apr, 2008 12:33 pm

I agree with Steve, and yes, keep those updates coming. 8-) 8-)
Dream It - Plan It - Build It
User avatar
Bill K
Buggyholic
 
Posts: 2168
Joined: 06 Thu Oct, 2005 8:08 am

Postby Texasbuggys » 22 Tue Apr, 2008 2:59 pm

LOOKS GREAT
Get your new short or long body, custom chassis, show cages, bumpers and accessories at http://www.texasbuggys.com

E-Mail Texasbuggys@suddenlink.net or call 361-218-6272
User avatar
Texasbuggys
Buggyholic
 
Posts: 1039
Joined: 01 Sat Oct, 2005 9:30 pm
Location: Victoria Texas

Postby CoryN » 25 Fri Apr, 2008 9:12 am

Mama says get off your butt and get that thing done, or go buy one that is already running. :?

So today is a good day to play hooky and work on the buggy. Stay tuned for todays progress. 8-)
CoryN
Buggyholic
 
Posts: 1108
Joined: 30 Wed Jan, 2008 12:11 pm
Location: McKinney, Texas

Postby GregR » 25 Fri Apr, 2008 9:41 am

Mama says get off your butt and get that thing done, or go buy one that is already running.


so is that an either/or ultimatum or a way to score 2 buggies....hmmmmmm ;-)
GregR
User avatar
GregR
Site Admin
 
Posts: 1335
Joined: 20 Tue Sep, 2005 9:47 am
Location: North Texas

Postby CoryN » 25 Fri Apr, 2008 10:03 am

That was my first response. Cool - I'll go buy you one, and then finish mine as time allows. She hesitated a second and then said, we don't need two buggies.

I was so close. :(
CoryN
Buggyholic
 
Posts: 1108
Joined: 30 Wed Jan, 2008 12:11 pm
Location: McKinney, Texas

Postby CoryN » 25 Fri Apr, 2008 10:09 am

OK - lets start with putting the torsion bars and spring arms back on first

Image
CoryN
Buggyholic
 
Posts: 1108
Joined: 30 Wed Jan, 2008 12:11 pm
Location: McKinney, Texas

Postby Buggy1 » 25 Fri Apr, 2008 10:40 am

I heard that ultimatum, seems alot of us have. My wife is after me to tet the engine done first then onto the actual buggy. I agree with her, I have pars all over my new garage setup. Due to the humber of pages it will take to tell the build my ultimate engine, I am going to put them on Neal's Corner. I got the computer problem solved so its time to get it up and runing!

Neal :o
Neal
Texas manx Club #1
RBC Dune Buggy Club
DSB Buggies
Meyer's Manx Dune Buggy Club #1898
Buggy1
Buggy Nut
 
Posts: 188
Joined: 21 Wed Sep, 2005 2:31 pm
Location: Dallas, Texas

Postby CoryN » 25 Fri Apr, 2008 11:03 am

Cool - look forward to seeing them.

Are the spring arms right and left unique?

I have the passenger side on, and up on the stop after multiple attempts at getting both sides on the correct splines so they match, and I cannot get the torsion arm cover on. Its about 1/8 of an inch off lining up with the screws.

I measured the spring arms in relation to where they attach to the torsion bars, and it seems like they might be as much as 1/8 off center. I thought I kept them separated so I knew which one went where.

Are they different? Or do I just need to do a better job of lining them up?
CoryN
Buggyholic
 
Posts: 1108
Joined: 30 Wed Jan, 2008 12:11 pm
Location: McKinney, Texas

Postby CoryN » 25 Fri Apr, 2008 12:19 pm

Well this is taking entirely too long.

Got one side on finally, at this rate all I'll have to show for today is the spring arms back on.
:roll:
CoryN
Buggyholic
 
Posts: 1108
Joined: 30 Wed Jan, 2008 12:11 pm
Location: McKinney, Texas

Postby CoryN » 25 Fri Apr, 2008 12:55 pm

Got them both on. That was a lot harder than I was expecting it to be. Thankfully the second one went a lot better. The easiest part was getting the spring arms back up on the stops under tension. That was the part I was worried about.

Image
CoryN
Buggyholic
 
Posts: 1108
Joined: 30 Wed Jan, 2008 12:11 pm
Location: McKinney, Texas

Postby David Head » 25 Fri Apr, 2008 2:16 pm

Cory, The answer to your question is Yes. There is a left side torsion bar and a right side torsion bar. It should be marked with an R or L.

You need to make sure that they are adjusted the same on both sides.

Once you get the wheels on and get the chassis rolling you should be able to tell by some measurements of the rear end and ride height whether or not they are equal (Right and Left side)

P.S. Did you ever get that Haynes manual I suggested?????
You would be surprised how much info is in it.

The good thing is-----Now that you have done it. It is a lot eaiser to do it the next time. They say it takes all day the first time, But you can do it in an hour the second time.

Looks Good to me. David
Maroon Manx

(o\_!_/o)
David Head
Buggyholic
 
Posts: 456
Joined: 22 Thu Sep, 2005 8:37 pm
Location: East Texas

Postby CoryN » 25 Fri Apr, 2008 3:11 pm

Torsion bars were marked, and I got them indexed the same on both sides. It was the springplates I was wondering about. But I got it all together with some persuasion.
CoryN
Buggyholic
 
Posts: 1108
Joined: 30 Wed Jan, 2008 12:11 pm
Location: McKinney, Texas

Postby CoryN » 25 Fri Apr, 2008 3:31 pm

Transaxle going back in

Image

Waiting on the bump stops to dry so I can finish buttoning that up. Need to paint the shocks yet and then replace the wheel bearings. Got new boots also to install.
CoryN
Buggyholic
 
Posts: 1108
Joined: 30 Wed Jan, 2008 12:11 pm
Location: McKinney, Texas

Postby Buggy1 » 25 Fri Apr, 2008 4:17 pm

I know you have the spring plates on but here is a tip for mounting the covers easier. I went to the store and got longer bolts. Made the installation easy, that way it can pull the cover over the rubber bushing.

Neal
Neal
Texas manx Club #1
RBC Dune Buggy Club
DSB Buggies
Meyer's Manx Dune Buggy Club #1898
Buggy1
Buggy Nut
 
Posts: 188
Joined: 21 Wed Sep, 2005 2:31 pm
Location: Dallas, Texas

Postby Vee Dub Nut » 25 Fri Apr, 2008 4:21 pm

Looking good!
Fightin' Texas Aggie Class of 2006

1967 Beetle
19?? Buggy (Someday hopefully... unless I sell it too LOL)
2000 GTi
Vee Dub Nut
Buggyholic
 
Posts: 281
Joined: 17 Mon Mar, 2008 6:21 pm
Location: San Antonio, Tx

Postby CoryN » 25 Fri Apr, 2008 4:56 pm

Buggy1 wrote:I know you have the spring plates on but here is a tip for mounting the covers easier. I went to the store and got longer bolts. Made the installation easy, that way it can pull the cover over the rubber bushing.

Neal


I agree - that would be the easiest solution, I just didn't want to stop and run to the store to get longer ones. I put the one that looked the most difficult to get to on first, then the diagonal then the other two. Took a little presuading to get them to line up. Putting tension on the spring arm moves it off center.
CoryN
Buggyholic
 
Posts: 1108
Joined: 30 Wed Jan, 2008 12:11 pm
Location: McKinney, Texas

Postby Bill K » 25 Fri Apr, 2008 8:47 pm

That looks like pretty slick work you are doing there, Cory.
Another nice Club car in the pipeline. 8-) 8-)
Dream It - Plan It - Build It
User avatar
Bill K
Buggyholic
 
Posts: 2168
Joined: 06 Thu Oct, 2005 8:08 am

Postby CoryN » 25 Fri Apr, 2008 8:57 pm

Thank you sir, if it looks half as good as yours I'll be happy!
CoryN
Buggyholic
 
Posts: 1108
Joined: 30 Wed Jan, 2008 12:11 pm
Location: McKinney, Texas

Postby MURZ » 25 Fri Apr, 2008 11:05 pm

Cory, what degree did you set the arms to? Are you going to lower it? Raise it? Stock?
Madisonville La
(Just north of where New Orleans used to be)

Dune buggies....Old men have to have something to excercise their minds and bodies
MURZ
Buggyholic
 
Posts: 342
Joined: 02 Sun Oct, 2005 10:06 pm
Location: Madisonville La.

Postby CoryN » 26 Sat Apr, 2008 6:56 am

I set them at 22 degrees. I read that was appropriate somewhere. That is where they were when I took it apart also.

I may very well change it again at some point when I'm closer to completion and can put the wheels up under the body to see what I've got.

I'm planning to run 15" centerlines like you had on your red buggy but I don't have them yet.
CoryN
Buggyholic
 
Posts: 1108
Joined: 30 Wed Jan, 2008 12:11 pm
Location: McKinney, Texas

Postby MURZ » 26 Sat Apr, 2008 11:37 am

Madisonville La
(Just north of where New Orleans used to be)

Dune buggies....Old men have to have something to excercise their minds and bodies
MURZ
Buggyholic
 
Posts: 342
Joined: 02 Sun Oct, 2005 10:06 pm
Location: Madisonville La.

Some more progress

Postby CoryN » 30 Wed Apr, 2008 7:24 pm

Got a few more items reassembled onto the pan

Image

Image
CoryN
Buggyholic
 
Posts: 1108
Joined: 30 Wed Jan, 2008 12:11 pm
Location: McKinney, Texas

Postby Aquabuggy » 30 Wed Apr, 2008 8:32 pm

Lookin good! Image
My name is Chris and well I'm a buggy-aholic

04 Aqua buggy - sold
72 Orange buggy - sold
72 Green longbody - aka Shrek http://texasmanxclub.com/bboard/viewtopic.php?t=1082
68 Manx - viewtopic.php?f=11&t=2509
User avatar
Aquabuggy
Buggyholic
 
Posts: 942
Joined: 02 Sun Oct, 2005 10:18 am
Location: Victoria Tx

Postby CoryN » 30 Wed Apr, 2008 8:37 pm

Thanks - certainly not on the same playing field as your build though.
CoryN
Buggyholic
 
Posts: 1108
Joined: 30 Wed Jan, 2008 12:11 pm
Location: McKinney, Texas

Postby Vee Dub Nut » 01 Thu May, 2008 8:15 am

Looking sharp Cory!
Fightin' Texas Aggie Class of 2006

1967 Beetle
19?? Buggy (Someday hopefully... unless I sell it too LOL)
2000 GTi
Vee Dub Nut
Buggyholic
 
Posts: 281
Joined: 17 Mon Mar, 2008 6:21 pm
Location: San Antonio, Tx

Postby Greaph » 02 Fri May, 2008 11:37 am

Bet yours is done before mine is :P Keep up the hard work and post pics....lots of pics ;-)
This IS my sig......
User avatar
Greaph
Buggy Nut
 
Posts: 88
Joined: 28 Mon Apr, 2008 6:52 pm
Location: San Antonio TX

Postby CoryN » 02 Fri May, 2008 12:06 pm

I'm looking forward to getting out there tomorrow to work on it. I'll keep posting pics as I go - starting to get a little nervous about wearing out my welcome though - I'm already in the top 15 posters and I've only been on the board a couple of months :shock:

I guess I'm used to some of the woodworking forums I belonged to where I had thousands of posts.
CoryN
Buggyholic
 
Posts: 1108
Joined: 30 Wed Jan, 2008 12:11 pm
Location: McKinney, Texas

Postby Greaph » 02 Fri May, 2008 12:58 pm

If everyone would post lots and lots of pics, I would be as happy as a ....(substitute your own metaphor)....


more ideas for me to stea.......uhm, modify to my own particular needs :lol: :lol: :lol: :lol:
This IS my sig......
User avatar
Greaph
Buggy Nut
 
Posts: 88
Joined: 28 Mon Apr, 2008 6:52 pm
Location: San Antonio TX

Postby CoryN » 02 Fri May, 2008 1:00 pm

Careful stealing any from me - I have no idea what I am doing. :lol:
CoryN
Buggyholic
 
Posts: 1108
Joined: 30 Wed Jan, 2008 12:11 pm
Location: McKinney, Texas

Next

Return to Member's Projects

Who is online

Users browsing this forum: No registered users and 24 guests